Training to Stay in the Game


     As we draw closer to the kickoff—no pun intended—of the NFL season, I’ve been thinking about the importance of staying healthy throughout the year. Injuries have shortened many promising careers, and we’ve all seen athletes who never quite return to form after a setback. Then there are the nagging injuries that don’t sideline players completely but must be managed week after week. Many past and current NFL players will tell you that, by midseason, everyone is carrying some kind of injury.

     That got me thinking about the parallels between professional athletes and active adults in their mid-fifties to seventies. By that point, most people have been diagnosed with something—tendonitis, arthritis, or maybe a minor tear—and they’re trying to keep up their workouts despite the pain. For them, staying active is their Super Bowl, and every small training victory is another step toward living the life they want.

     Early in my career as a trainer, when someone told me they had an achy back, knee, or shoulder, my immediate response was: take some time off. My logic was simple—I didn’t want to make it worse. I also knew I wasn’t a doctor, and I wasn’t going to play one by trying to diagnose their issue. (I still remind my doctor friends: I won’t diagnose injuries if you don’t assign workouts!)

     What I observed over time was surprising. Many people didn’t get better with rest alone. In fact, especially for those over 55, some got worse, simply becoming stiffer. That’s when I shifted my mindset. Instead of telling them to quit training, I helped them modify. Respect the injury, never ignore it, but don’t stop moving. Today, this “train but adjust” approach is widely adopted across the fitness industry.

 
Lower Back Pain

     Lower back pain is one of the most common issues I see. It can come from a single incident or from overuse. The biggest mistake? Obsessing over what caused it, a bad night’s sleep, poor office posture, dehydration, or that last workout. More often than not, it’s an accumulation of all these factors.

     I take a “reset approach.” Focus first on exercises that restore posture and encourage a neutral spine. (If you want a deeper dive into what “neutral spine” means, I wrote about that here:  What is Neutral).

     I avoid heavy spinal compression, like overhead pressing, and instead turn to bodyweight drills and TRX work, since the load is always adjustable. In more severe cases, I bring in floor-based movements. Pain often distorts posture, such as shoulders hunching  forward, the upper back rounds. Training in a supported floor position lets gravity help restore proper alignment.

 
Knee Pain

     As someone who lives with severe knee arthritis, I know firsthand the frustration of constant knee pain. Whether it’s from too much activity or too little, the outcome feels the same—it hurts. Over the years, I’ve trained plenty of clients with meniscus tears, ACL reconstructions, and knee replacements.

     The first rule? Eliminate unnecessary load. Focus instead on mobility, since inflammation often limits range of motion. Movement itself can act as a pump, flushing out swelling and improving function.

     I prioritize training the muscles that stabilize the knee, which are primarily the posterior chain: the glutes, hamstrings, and erector spinae. That means plenty of bridging variations. I also add core work, which is not an obvious connection, but essential. Think about it: the pelvis dictates the alignment of the femur, which directly determines the stresses placed on the knee.

     Finally, I make sure to train the lateral glutes, especially the gluteus medius. This small, but powerful muscle, prevents the knee from collapsing inward (a valgus collapse). Something as simple as lateral miniband walks can go a long way in reducing knee discomfort.

     I believe that movement is medicine. The goal isn’t just performance—it’s longevity. Keep moving, proceed with caution, and never force through pain. For most of us, the game isn’t the NFL playoffs, it’s the game of life. The better we move, the longer we stay in it.


A New Way to Train Core

     Core training has become a consistent pillar in the fitness and strength training worlds. While health care professionals agree on its importance, there is little consensus on what truly constitutes the core, its function, and the best way to train it. This lack of clarity often leads to confusion about effective core training strategies.

What Is the Core?

     Dr. Stuart McGill, a renowned spine biomechanics expert, defines the core as a complex of muscles that surround and stabilize the spine—not just the abdominal muscles associated with a "six-pack." According to McGill, the core includes muscles that wrap around the spine from all directions: top, bottom, front, back, and sides. These muscles must coordinate to provide stiffness and stability to the spine, which is crucial for protecting the back from injury and enabling efficient movement of the limbs. In McGill's view, the core musculature forms a box-like structure around the spine.

     Movement expert and physical therapist, Gray Cook, further emphasizes that the core’s main function is to create a stable platform—proximal stability for distal mobility—allowing the arms and legs to move efficiently and powerfully. For Cook, core training is about improving movement quality and ensuring that the deeper, stabilizing muscles are coordinated and activated before the larger, superficial muscles.

The Three Planes of Motion

The body moves in three planes of motion:

  • Sagittal Plane: Divides the body into left and right halves. Movements are typically forward and backward, such as flexion and extension.
  • Frontal Plane: Divides the body into front (anterior) and back (posterior) regions. Movements are side to side.
  • Transverse (Rotational) Plane: Divides the body into top and bottom halves. Movements involve rotation or twisting.


When designing a core training program, it’s important to include exercises that address each of these planes. Some drills can even engage multiple planes at once. A common mistake is to focus on only one plane, leading to imbalanced development.

Integration Over Isolation

     Another frequent error in core training is isolating muscles rather than training them as part of integrated movement. The body moves like an orchestra, with all muscles working together in concert. Dr. Shirley Sahrmann, a leader in movement system impairment and core stability, states:

“The core should be trained as part of integrated, functional movement, not as a collection of isolated muscle contractions. This approach ensures that the body learns to stabilize and move efficiently during real-life activities.”

Exercises that attempt to isolate the core may not translate to improved movement or reduced injury risk if not integrated into broader movement retraining.

Sample Core Workout

Try this workout to strengthen your core across all planes of motion:

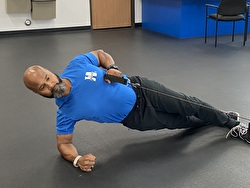
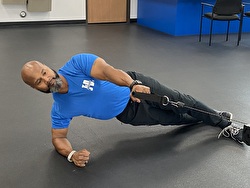
Cable Rows from Side Plank
Using a resistance band or cable pulley, perform rows (horizontal pull) from a side plank position. Complete 3–4 sets of 10–12 repetitions on both sides.


 IMG_3863_copy      IMG_3862_copy

Kettlebell Overhead Press with Internal Rotation
Holding a kettlebell or dumbbell, perform an overhead press. As you press the load overhead, internally rotate the foot on the same side. Complete 3–4 sets of 6–8 repetitions with both arms.


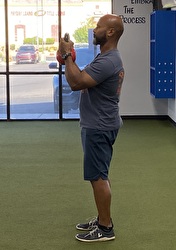
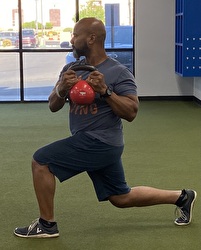
Lunge with Rotating Load
Holding a kettlebell, take a reverse step into a lunge while rotating the kettlebell to the side of your torso. Complete 3–4 sets of 8–10 repetitions on both legs.

IMG_3896       IMG_3900_copy1


The Coaches Feedback Loop

     A key part of making progress with your trainer is the feedback loop—the ability to receive, understand, and adjust based on feedback. In technology, this process often determines success or failure. It’s common for a piece of software to be released with the understanding that it’s imperfect. Users provide feedback, and developers make necessary adjustments over time. This initial usage is essentially a beta test. Consider the evolution from the first iPhone to what’s available today: we forget that the original lacked an app store, had poor reception, and was only available from AT&T.

Picture1_copy1

     The same feedback loop exists in the trainer-trainee dynamic during exercise. Assuming the drill is appropriate, the coach may offer a few critiques on form. From there, several scenarios can unfold:

Scenario One: The person trusts the coach and attempts to adjust. The coach, not expecting perfection, positively acknowledges these efforts. Over time, execution improves.
Scenario Two: The coach isn’t mindful to their wording. The person takes the critique personally and asks for a different exercise. The coach, wanting to avoid conflict, complies. The area of weakness remains unaddressed.
Scenario Three: The coach recommends an exercise, but provides no feedback as the trainee performs it incorrectly. The trainee misses out on the benefits, and the weakness or dysfunction persists. (This is also common in the physical therapy model.)
In each case, communication—or the lack thereof—is central. The value of having a coach is immense. Great athletes often credit their coaches for unlocking their potential: Muhammad Ali had Angelo Dundee, Michael Jordan had Phil Jackson, and Patrick Mahomes has Andy Reid. A good coach knows when to push, when to pull back, and when to pivot. They understand the weight of their words and choose them carefully.

   Picture2Picture3

     In today’s world, where convenience is king, hearing “you need to work harder” can be disruptive. Yet, discomfort is sometimes the medicine we need. I’ve described how pushing a weighted sled or doing intervals on an Airbike is tough, but the benefits of strength, improved cardiovascular health, and reduced body fat are worth it. It’s not always about finding a hack; sometimes, you simply have to put your head down and work. While modern life offers rapid improvements, like food cooked in a microwave, exercise requires a “slow cooker” mindset.

     Within the feedback loop, coaches help temper expectations. Progress in exercise isn’t linear; daily improvements are unrealistic. For example, you might not lose body fat in a month or increase your weights every session. Adaptations can be so subtle that it’s hard to tell if you’re improving. This is when you must trust the process. Whether your goal is fat loss or muscle gain, progress can be emotional. We all want results faster than is realistic, but having someone to keep you grounded and focused on practical goals is invaluable. Sometimes, we overcomplicate what needs to be done. First, ask if the program is based on proven strategies? Second, am I getting everything I can out of it? If you answered yes to the first and no to the second, work with your coach to turn that second answer into a “yes.” Use feedback as the powerful tool it is, and turn your goals into reality.


Isometrics and How We Use Them


     Isometric training has been practiced for centuries. The earliest adopters included martial artists in India, China, and Japan, as well as Buddhist monks and yogis. Evidence suggests that isometric exercises date back as far as 3000 BC, with ancient practitioners developing static postures for both physical conditioning and spiritual or ritual purposes. Today, isometric exercises are widely used in rehabilitation and are a standard approach in physical therapy. Recent research supports the idea that this safe training method can promote muscle growth and improve joint and tendon health. If you train at the studio, you have experienced some form of isometric training within your program.

     Isometric training involves exercises in which muscles contract and generate force without changing length or causing movement at the joint. In other words, the muscle remains at a constant length under tension, and the joint angle does not change during the contraction. The term "isometric" comes from the Greek words isos (equal) and metria (measuring). One benefit of isometric exercise is that it requires minimal, if any, equipment, making it accessible and commonly used in school gym classes. For many, their first exposure to isometrics is the wall sit. In this exercise, you position your back against a wall with your knees and hips at a ninety-degree angle and your thighs parallel to the floor. The resistance comes from gravity. You hold this position for a set period, starting at 10 seconds and potentially exceeding one minute.


Within isometric training, there are three primary types of muscle contractions. These can be combined to significantly increase neurological response and muscle fiber recruitment, leading to greater force production:

Static Contraction: In this type, you contract the muscle without moving or pushing against anything. Bodybuilders often use this when posing.


Yielding Contraction: This involves holding a position against resistance, stimulating higher muscle fiber recruitment. Examples include holding the top position of a pull-up or a plank.


Overcoming Contraction: The most powerful type, this involves pushing or pulling against an immovable object, such as pressing against a wall.


     Isometric exercises have also shown positive results in increasing mobility. In Supertraining: A Scientific Teaching Method for Strength, Endurance, and Weight Training, author Mel Siff, PhD, cites research with renowned Russian sports scientist Yuri Verkhoshansky: “All fitness conditioning, including flexibility enhancement, relies predominantly on neuromuscular stimulation.” Professional athletes across multiple sports now incorporate isometric stretching to increase mobility and minimize injury risk.

     A few examples of how we use isometrics at the studio are:

  • Holding the top position (hip extension) of a single leg bridge for five seconds. Many people never reach full hip extension when performing bridges. The usage of isometrics in this drill allows the user to reach full hip extension, which generate a full contraction of the glutes.

  • Holding the bottom position of a lunge for thirty seconds. Lunges, and all their variations, are one of the more challenging drills we program into workouts. What makes them a good exercise, deceleration, is also what makes it tough for people to perform them with good technique. Using an isometric in the mid-range of the drill allows people to “put the brakes on” and execute with perfect form.

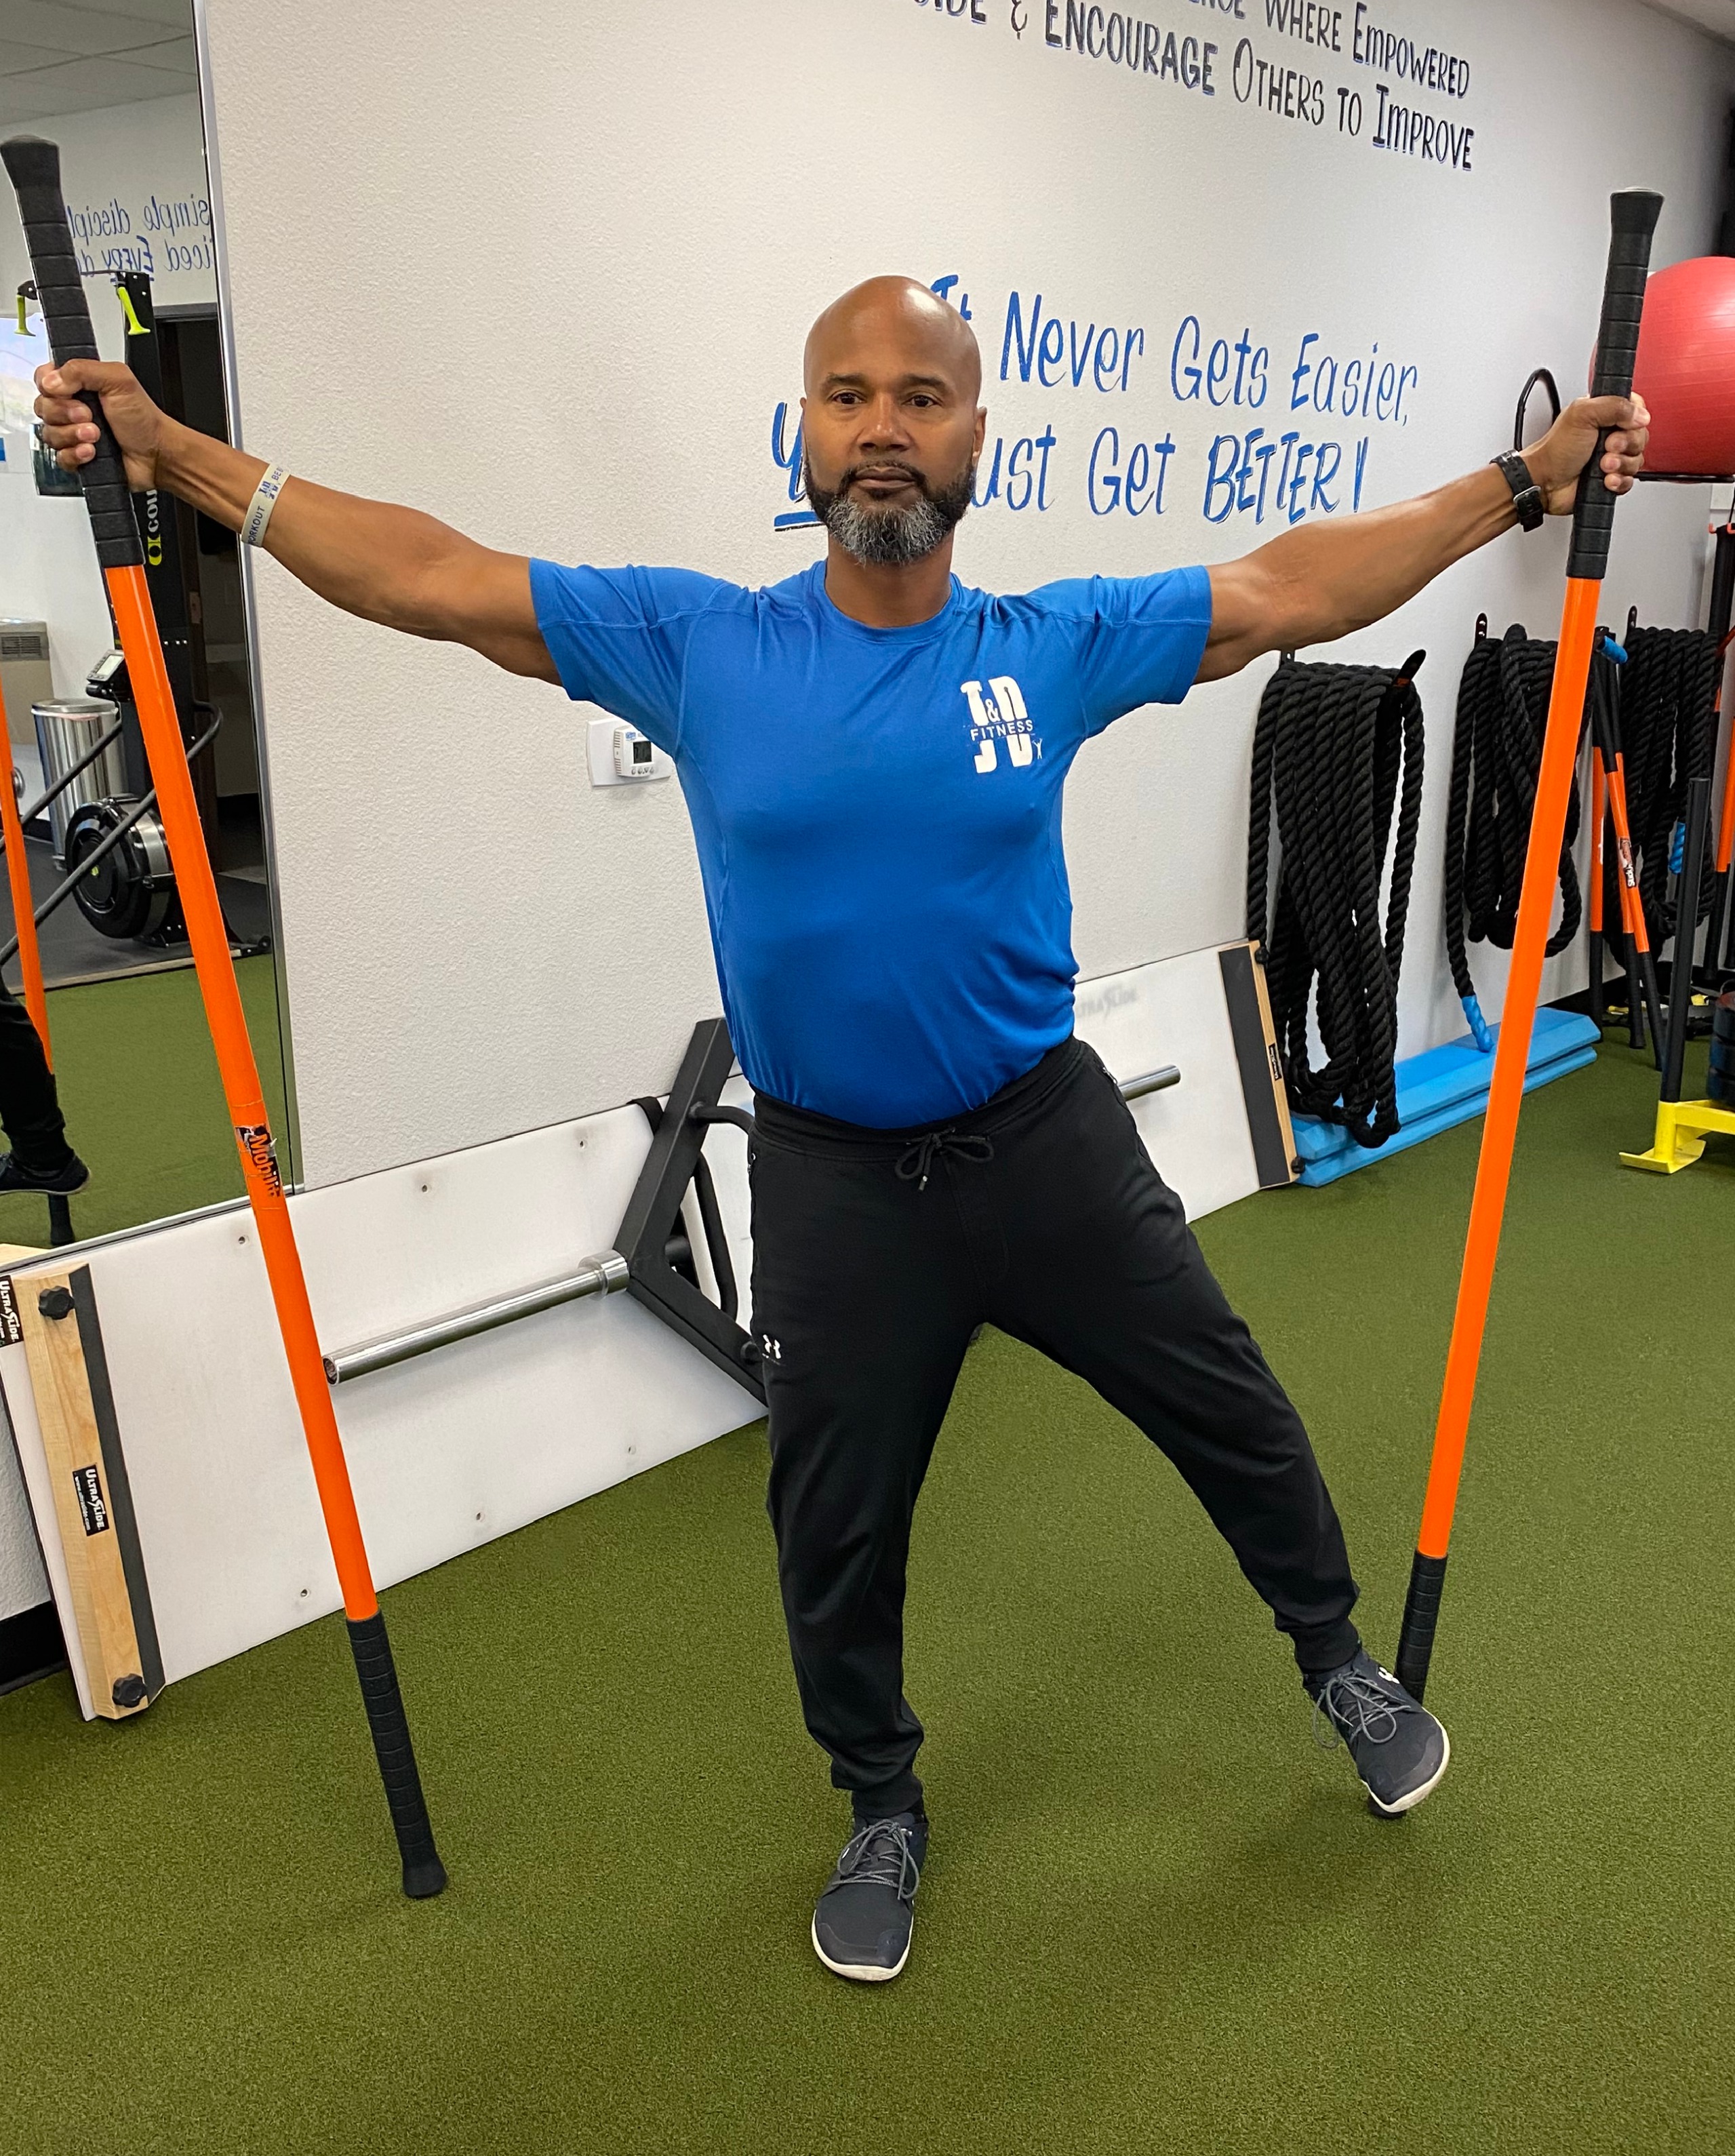
  •  Using Mobility Sticks, holding and pressing your foot against the stick laterally for a five second hold. It’s common for people to have trouble engaging some of their smaller muscle groups, such as gluteus medius. What these smaller muscles lack in shear size, they make up for in responsibility. The gluteus medius is a key stabilizer of the pelvis. Its main function, beyond hip abduction and rotation, is to maintain pelvic stability, especially during activities that involve single-leg weight bearing such as walking, running, and standing on one leg. An internationally recognized physical therapist, Diane Lee, writes in her book, The Pelvic Girdle, the importance of training the gluteus medius for optimal function and stability of the lumbopelvic-hip complex. She highlights that the primary function of this region is to safely transfer loads, while meeting the demands of movement and control.

blog pic

     Another critical reason we like to use isometrics at the studio is because they are a tool we can use with anyone. They play a role with helping beginners, those nursing an injury, to increasing difficulty in an exercise for the advanced. That’s important because part of our job is to meet our members where they are.


Isolation Training Versus Movement Training


     Early in my training career, back in the early 1990s, I spent most of my time training clients with an isolated approach. I divided the body into muscle groups such as quadriceps, hamstrings, calves, lats, pectorals, deltoids, biceps, triceps, and abdominals. I would then group two or three of these muscle groups into a single workout and select two to three exercises per body part. Pretty simple.


     The “classic” split was chest, shoulders, and triceps on day one; back, biceps, and abdominals on day two; followed by legs (quadriceps, hamstrings, and calves) on day three. This style of training has its benefits: you can increase muscle size, or hypertrophy, within a specific muscle. It was also easy to implement, especially as the gym industry was booming. Facilities were expanding from 5,000 to over 30,000 square feet, and new machines were developed to fill these larger spaces.


     Around the turn of the century, circa 2001–2003, some strength coaches began to question this protocol. They asked: if a muscle is larger, does that necessarily mean it’s stronger? Just use the eyeball test and watch Olympic lifters. They can lift and control enormous loads, two to three times their body weight, and yet, they often don’t appear especially large or overly muscular.


     It was during this time that a shift toward movement-based training began. Instead of isolating the quadriceps with leg extensions, I began to favor lunges or squats. Instead of training the chest with a machine fly, I’d choose a horizontal pushing exercise like a push-up, sometimes with my feet suspended in a TRX for added core engagement. As time went on, research began to validate this new approach, showing that a global or movement-based style of training engages more muscles throughout the body.


     The big breakthrough was the realization that we don’t move in isolation. We’re not robots and our muscles work together in concert. Take the goblet squat with a kettlebell, for example: as you lower into the bottom of the squat, your hamstrings contract while your quadriceps lengthen. As you drive out of the bottom position, the quadriceps contract and the hamstrings stretch. And that’s not even mentioning the glutes, which are also heavily involved. The squat is anything but isolated. Many argue that what makes this exercise so beneficial is the sheer number of muscles engaged in a single movement. Yet, if you visit any big-box gym, you’ll often find a line for the leg press machine and empty squat racks.


     I believe the biggest difference between these two approaches is that movement-based training requires more motor control. Your brain, as the center of your nervous system, sends signals to your muscles to contract and relax. The better your motor control, the more effectively you can control your muscles. Just watch a child learning to walk. They stumble and fall as their body learns to coordinate itself, becoming stronger and more competent over time.


     I’ve shared before how, after winning a national bodybuilding competition, I strained a hamstring playing softball at a family picnic. My legs were well developed, but at that time I didn’t have the motor control needed to sprint quickly and generate a series of forceful muscle contractions from a standstill.


     So, what’s the answer? Which approach is best? What if you want to move like a gazelle and look like a cartoon superhero? Maybe the recipe is to incorporate elements of both styles into your training.


     Perhaps the optimal approach isn’t to choose one or the other, but to blend both. Train for strength and power using movement patterns and use isolation training to build hypertrophy in specific areas, if that’s your goal. Instead of arguing that one method is superior, consider that you can train for both functionality and aesthetics. I believe it’s possible, but you need a strategy.


Pain-free Overhead Pressing


     Using a movement-based approach for a strength training program design, one of the basic tenets is to push or press load. That can include both horizontal and vertical directions. Pressing a load horizontally with success requires that you select the proper load amount. A push-up is a horizontal press, but for either a beginner or a deconditioned person, it may be too high of an entry point. In that situation, we can opt for a TRX chest press, where we can adjust the load by positioning the person appropriately, or a standing press using a resistance band. The band press also has the benefit of increasing load when the person is at their strongest point in the strength curve. Vertical pressing has a few other considerations, other than simply load selection. Tissue quality of the thoracic spine and pectoralis, scapula movement and control, postural issues, and alignment all play a role in determining if a person is a suitable candidate for overhead pressing. Ignoring any or all these elements can set someone up for pain and/or an injury. I like to use the analogy of driving with your emergency brake on. You can get your car to move with the brake on by pressing the gas, but understand that you are prematurely wearing down parts. Pressing a load overhead with poor posture and lack of mobility in the upper back can produce a similar outcome of excessive wear of joints and connective tissue.


ASSESSMENT


     Prior to having someone attempt to press a weight overhead, I first assess if they have the ability to get their arm efficiently overhead without load. This is called shoulder flexion. Load just magnifies the force placed upon the joint, so if there is a compromise of movement without weight, weight will only make matters worse. When putting the shoulder into flexion the humeral head rolls posteriorly and glides inferiorly on the glenoid fossa (shoulder joint) for the first 60° of movement. After this, the humeral head remains stable within the glenoid fossa. As far as joint range of motion, the normal range for shoulder flexion is approximately 0–180°, starting from the arm at your side to fully extended overhead. I am currently using the Functional Movement Screen (FMS) to determine this. There are other assessments available, but I like this option for ease of administration. It requires you to take a measurement. Regardless of which assessment you choose, let’s agree that some type of assessment or screening should be applied. I follow the credo of “If you’re not assessing, you’re guessing.” If they can display adequate movement, then we must exercise good judgement with what load to use. If they don’t, we should investigate why and then use a strategy to improve the disfunction. One example of this, which I frequently see is poor thoracic (upper back) extension or the inability to dissociate thoracic movement from the glenohumeral motion, which creates a restriction of shoulder mobility. This often leads to compensatory movements like excessive spinal arching during overhead activities. We’ve experienced success by having this person initially foam roll their upper back using Grid and Rollga foam rollers and then graduating to trigger point work using hard balls, such as the Acumobility balls.


https://www.instagram.com/p/B1KEj2eHGVY/?utm_source=ig_web_copy_link&igsh=MzRlODBiNWFlZA==


SCAP “J” MOVEMENT


     During healthy shoulder flexion the scapulae glides upward on the ribcage in a “J” shape. Internationally recognized physical therapist and author of Diagnosis and Treatment of Movement Impairment Syndromes, Shirley Sahrmann, states that “scapular disfunction occurs due to dominance or stiffness of downward rotators (e.g., rhomboids, levator scapulae, latissimus dorsi (lats), pectoralis minor/major) and reduced activity of upward rotators like the serratus anterior and trapezius.” To address this, we have used a two-step process of foam rolling the lats and pec minor area partnered with scapulae CARs (controlled articular rotations) or overhead reaches performed using a band or by rolling a foam roller against the wall using the forearms. The end goal of re-establishing good scapulae “glide” can take some time, depending on the amount of time the person has been in this state of impaired movement.


https://youtu.be/AuVabTPn1g8?si=hCNKUp_cUtmiRsB7


https://youtu.be/hwMAea360D4?si=KyE08sOoeMwp7-03


CONTROL


     Sometimes the person will possess the ability to get the arm overhead without proper control. This can lead to winging of the scapulae. As compared to the shoulder blade sitting on the ribcage, it starts to detract, giving the appearance of a wing on their back. After observing this, one of the exercises we like to implement is the TRX “Y” flye. We coach the person to maintain a plank by stacking their body, ribcage over pelvis, as they pull themselves into the “Y” finished position without shrugging in the upper traps.


     There are times when pressing overhead is contra-indicated for someone and should not be in their program. This is when having a coach is helpful and can redirect their focus and energies to other areas to focus on. I don’t believe in categorizing exercises as bad, but rather, exercises some people should not perform.


The Value of a Daily Reset


   As a personal trainer I am frequently confronted with people who wish to make a change. In most scenarios, the change tends to be physical, a desire to change the outward appearance. I’ve also encountered those who wish to make a more cerebral change by embracing a healthier lifestyle. In all situations, I explain that the key is going to be consistency. Committing to an exercise regime (two, three, or four days a week) will make a positive difference and steer you in the right direction, but even the best executed program can sometimes fall a little short. Every day we perform small minor tasks that make our lives easier in one way but come at a cost in another. This may be the amount of time we spend on our phones, which places us in a poor posture (downward head position), or the time spent binge watching a new streaming series, which adds to our sedentary time, or the consumption of overly processed foods, which can lead to excessive calories. Now, I’m not a monk and have participated in each of the prior mentioned scenarios, but as in all course corrections, I believe the first step is acceptance of a problem. So, what’s the fix? How do you undo the evils of modern society? You allocate time every day to reset.


dailyreset


     The immediate response to my suggestion may be, “Add MORE to do in my over-scheduled day? That’s not happening.” The amount of time I’m recommending is ten minutes. You will intentionally spend ten minutes every day making yourself better. Ten minutes to get your mind and body right. A big part of this process is how you mentally approach this task. I’m a firm believer that we make time for what’s important to us. We also tend to shy away from work, remember how the river flows towards the path of least resistance. This is not a workout and is not meant to challenge you. Making a substantial change doesn’t always require you to make a substantial investment in money, time, or in this case, effort. As I mentioned earlier, the key is consistency. The change happens over time from the effects of compounding.


     Consider you’re an accountant and you suffer from tightness in your hips and lower back from sitting at your desk. Ten minutes of mobility work performed every morning right when you wake up will go a long way. If you’re a dentist or mechanic who suffers from neck and back problems, due to standing in a compromised position of a forward head position for extended periods of time, 10 minutes of re-aligning your spine on a foam roller can navigate you out of pain over time. You may need ten minutes of quite meditation to calm your mind and lower the anxiety levels that trigger you to make poor eating choices.  


ds


     Don’t try to fix too much at once. Prioritize and pick one thing you wish to improve. Create the daily habit and then start. Don’t strive for perfection. Accept that there will be missteps along the way, don’t let that deter you. Disregard the “All or nothing mindset” and embrace the process and remember you’re playing the long game. Track and keep a record of everyday you complete the task. That’s how you’ll keep score.


Orthopedic Cost


     George Bernard Shaw stated that “Youth is wasted on the young.” The strength and conditioning industry typically attracts people when they are in their twenties. As with most industries, as you learn strength training principles and protocols, initial reactions and stances on subject matters can be myopic in perspective. In exercise, most coaches and trainers will form their opinion of an exercise based upon how it feels to them. Based upon which direction you take in the fitness industry (youth fitness, athletic training, general population, etc.), your thoughts may change over time. As a trainer who is currently in his mid-fifties and trains people from the general population who range from 50- 70 years of age, I tend to use exercises in my programs that are low impact and joint friendly. Years ago, when CrossFit gyms were all the rage, if you passed by one of those facilities as they were starting a group workout, it was commonplace to observe the members taking a 15-minute run as part of their warm-up. Around the block from my studio is an ice skating


eblast12225


rink and we frequently observe the hockey kids running outside as part of their off-ice conditioning. For most of the people we serve at the studio, running is not a good option. I want to add that we do work with a select population of young athletes returning from injuries and a running protocol is part of their program. To participate in their sport, running is required. This is more directed towards people in the general population training for health and fitness. Out of fairness to any runners who may be reading this, I understand the many health benefits associated with running, but it does come at a cost. This cost has been identified as orthopedic cost.


     Internationally recognized coach, Mike Boyle, defined orthopedic cost as “the stress and strain imposed by an exercise on the non-target tissue.” To use our prior mentioned activity of running, it’s a great activity for building lower body endurance and cardiovascular strength, but the high impact places unwanted stress on knees and the spine. High impact activities can produce three to five times, one’s bodyweight of force on the body, I’ve seen some higher. That means a 175-pound male will experience 525- 875 pounds of force on their ankles, knees and lumbar spine when running. Some may argue that stress is a good thing and it’s this stress that forces the body to adapt by becoming more resilient. I agree with that theory, to a point. I like to use the sandpaper analogy to make a point. Having slightly calloused skin on your hands is a benefit. If not, activities such as holding bars and kettlebell handles during exercise would cause damage and could break skin making them bleed. If you took a piece of sandpaper and scuffed your hands with it for a couple minutes, they would become calloused. That’s a good thing. If you took that same piece of sandpaper and rubbed your skin of your palms for thirty minutes, they would bleed. When I look at an exercise, I consider if that drill will make a person’s body “bleed” over time.


     When I began mapping out the equipment selection for the studio, and the exercises that would be my foundational movements, I gravitated towards drills using the TRX suspension trainer, the Ultimate sandbag, and kettlebells because I could place a positive stress upon my members at a minimal orthopedic cost. Sandbag cleans, suspended push-ups in the TRX, kettlebell goblet squats produce good strength outcomes with minimal stress on shoulders, knees, and lower backs. Here’s an example of a bent over row partnered with an overhead press using a 54lb kettlebell. If I were using a barbell, I would need 135 pounds to get the same training effect.


https://www.instagram.com/janddfitness/reel/CgNOyaBjNr6/


     Another influence is the thirty-four years I’ve spent training people. I’ve had time in the big box gyms and have used some of the more popular exercises you may see. I’ve also seen when people have a bad outcome and complain about back or shoulder pain. I opened this rant today stating Shaw’s quote on how youth is wasted on the young, because many trainers in their twenties will argue that orthopedic cost doesn’t exist. My response to them is to come back to me after twenty years of not only training yourself, but also training over two hundred people.


Goal Setting, the Macro and Micro Steps


     I enjoy goal setting. Many of us do. My favorite part is creating the steps needed to reach my goal. This may be partly due to my obsession at times with details, but nonetheless, for a while I thought everyone enjoyed this step. As many people start the new year with new goals in tow, I thought this would be an appropriate time to share a few steps you should take to help you get to the finish line.


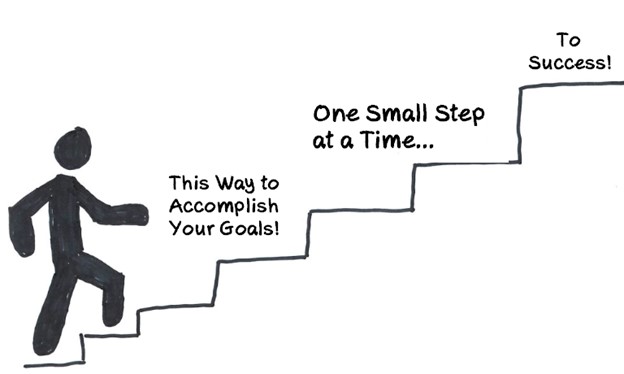
     The first step is to minimize the number of goals to undertake at a time. This list should not resemble the Christmas wish list of an eight-year-old. I want to lose twenty-five pounds, spend more time with my family, go to church more, and start meditating daily. All worthy goals, but a better approach is to concentrate on one at a time. Each goal requires a series of steps, and it’s in mapping out these steps that you’ll achieve success. James Clear, author of Atomic Habits, shares how the first step is creating a simple task towards the goal that you perform daily. He recommends that this task take less than 2 minutes. The objective here is simplicity. What you’re doing is building a habit, and habits change behaviors. I like to call these the micro steps. These smaller steps compound over time, like interest with money, and create the more impressive large, macro changes over time.


1225


   One of the steps I strive to coach members of our studio (janddfitness.com) is the value of a warm-up. Attracting people north of forty years of age, the risk of injury is more apparent. The only way to improve someone’s fitness level is to keep them in the game, working out, not at home nursing an injury. We have a simple warm-up everyone does consisting of soft tissue work using a foam roller followed by a few mobility drills. If someone has a particular ailment, we will add a drill or two to the fold. Effort wise the drills are easy and don’t take more than eight to ten minutes to complete. The value of a warm-up became evident to me from years of training people privately in their homes before opening the studio. It was common for my early morning people suggesting we jump right into the workout bypassing the warm-up, only to sustain a “pulled” back or shoulder. The culprit was always a specific exercise, not that their body wasn’t properly prepared to load the tissue or joint. Like a parent with their kid, picking when to fight their battles, when I became adamant about warming people up, these issues instantly subsided.


   A step I recommend you perform every week, that takes three to five minutes, is to schedule your workouts for the week ahead of time. Don’t leave it for when you have time. Every week you should think about when you plan on exercising for the upcoming week. This is a mind shift that must occur. To make a change, you need concentrated focus, that focus requires making that goal a priority. Disney CEO and Chairman Bob Iger wrote in his personal memoir, Ride of a Lifetime, how he didn’t want to lose time with his kids while taking the reigns of running Disney. He made it a habit to have dinner with his kids on most days of the week. Pulling away from work around 6pm did mean he would have to return to work after dinner on most nights, but he found that hour of time with his kids irreplaceable.


     When creating a goal, sit down and break the goal down into the necessary steps. Dropping twenty pounds requires more than just starting to workout. It means losing three to five pounds a month. That requires an increase in energy expenditure or burned calories. This also includes a deficit in calories, which translates to monitoring how many calories you consume. The last step is enhancing your body’s metabolism which is achieved by increasing lean muscle mass. Take the outcome you desire and break it down into the small micro steps it takes, and that’s how you will make the tremendous change you wish to achieve.


How to Train Your Glutes Effectively


     Training the “glute” muscles for more than aesthetics has grown in popularity outside the ranks of bodybuilders, athletes, and social media influencers of recent. The glutes are essentially the buttocks and include the gluteus maximus, gluteus medius, and gluteus minimus. They are the largest hip extensors in the body. Along with extension of the hip, they affect both mobility and stability of the hip capsule, provide proper tracking of the knee, and aid in reducing stress on both the lower back and hamstrings. Everyone that trains at our studio does some type of glute training.


     Decades ago, renowned physical therapists, Vladimir Janda, noticed certain patterns in patients with back pain. Specifically, he noticed that these patients had signs of inhibited weak glutes. Researcher Dr. Stuart McGill provided data in 2013 that birthed the term glute amnesia, which are inhibited weak glutes. In this study, they monitored glute activation while participants performed glute bridge exercises. They then performed a therapeutic procedure called capsular distension arthrogram which created pain in the hip area. They immediately re-tested and observed diminished glute activity. The common misconception is that the glutes “turn off” when exposed to pain. They never turn off, but rather experience a decrease in neural drive from the brain, a process called arthrogenic neuromuscular inhibition. To maintain a pain-free and healthy lifestyle, everyone should include some form of glute training in their exercise regime.


     Here are a few of my favorite exercises for training the glutes.


     Supine Single Leg Hip Extension- One of the best exercises you can perform is the single leg bridge. Since most people demonstrate asymmetries throughout their body, I recommend that you perform this exercise one leg at a time to maximize glute engagement. Lie on the ground and draw one leg close to your abdominals by holding the knee. If you experience knee discomfort, you can hold behind the knee. The purpose for drawing in and holding the non-bridging leg is to ensure that the hip extends the hip flexors and not the lower back. It’s a common error to lift oneself off the ground by arching the lower back and performing extension of the spine. Start the movement by driving the hips off the ground by pressing the heel into the ground. Because many people tend to be quadricep dominant and have tight and shortened hip flexors, I recommend the emphasis on driving through the heel. Complete eight to ten repetitions on each leg for a total of three sets.


     Loaded Marches- Holding either a dumbbell or kettlebell in front of the chest, perform a standing march in place. Maintain a tall posture and avoid flexing at the hip as you draw a single leg into a flexed knee position. Provide a static pause and hold for one to two seconds before lowering and alternating to the other leg. This exercise trains the mobility of the anterior hip capsule as you draw a leg up, while safely and effectively demanding hip stability from the other leg. Complete eight to ten repetitions for three sets. Challenge the height of the knee as you march and execute a slow and controlled tempo as you march.


     Step Ups- While holding two dumbbells step up onto a stable platform or box. For safety,


112024pic   112024pic2


perform your initial set of ten repetitions without load. Maintain good posture throughout the movement and keep the whole foot securely on the platform as you step up, making sure to extend the hip at the top of the drill. Avoid using too much load and perform ten to twelve repetitions on each leg for three sets.


     Give these a try and experience the rewards of stronger glutes.


Next