One of the biggest fears with working out is getting hurt. We want the results. We’re willing to put in the work. But what’s the right dosage? It’s similar to cooking. There are some grey issues and everything isn’t just black and white. Like cooking though, too much of an ingredient or too long in the oven can ruin your dish, or in the case of working out, you. When recommending an exercise, there is an order that if you follow it, will provide you solid results. The challenge you run into is that people like to skip some of the necessary steps. It’s my belief that people have to earn the right to proceed.
Step One. You must perform an assessment. In the strength and conditioning world, there is a saying that “if you’re not assessing, you’re guessing”. I agree with that. We perform a 7-point movement assessment at the studio, The Functional Movement Screen (FMS), and many of you reading this may have done it. If you’re not familiar with the screen, here’s a quick video explaining it from the team at FMS.
https://www.youtube.com/watch?v=p5yqSZaz4ms#action=share
Prior to the screen being developed, approximately fifteen years ago, there weren’t many assessments available. I started training people in 1991. Back then, the smart approach was to start someone with a vanilla, basic workout and adjust as you get to learn their body. This took time, sometimes up to a month of training to determine the right recipe. During the early years of my career, I did get to work with a lot of people, which provided me tons of valuable experience. The other side of the coin is that this cost money for the person, and valuable time. Performing the FMS allows you to hit the ground running from day one.
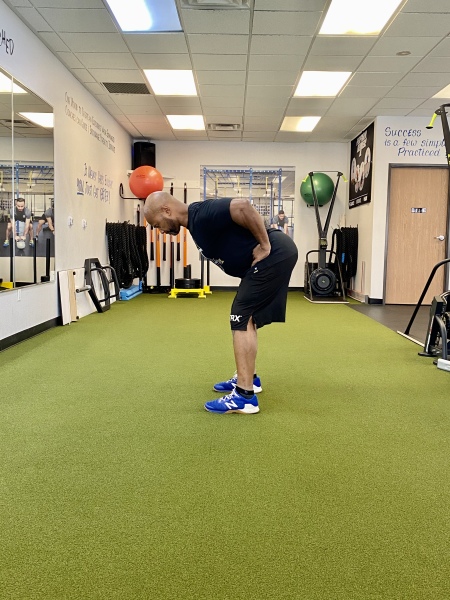
Step Two. Draft up a routine around their goals. At the studio, a few common goals are fat loss, strength, and improving overall fitness level. People like to “feel” that they’re in shape. A movement I would prescribe at that point would be either Kettlebell swings, cleans with the Ultimate sandbag, or any type of explosive hip hinge pattern exercise. Hip hinge exercises address the posterior kinetic chain (hamstrings, gluteus maximus, lumbar spine and latissimus dorsi). These are big muscles, ideal for providing overall strength. Big muscles require large amounts of energy (calories), which makes them fat burning machines. That achieves the fat loss. When you perform these hip hinge exercises in an explosive manner they also challenge your cardiopulmonary system. This addresses the feeling of being in shape. Sounds pretty simple, right? Wrong. No one should start with these exercises. Based upon their assessment, loaded hip hinge exercises may be contra-indicated. They may not have adequate pelvic strength or control to maintain that position when under load. A proper hip hinge allows you to drive your hips back creating a sling shot effect for when you come out of the mid-point of the movement. Here’s an example of me performing a hip hinge and pausing at the mid-range.

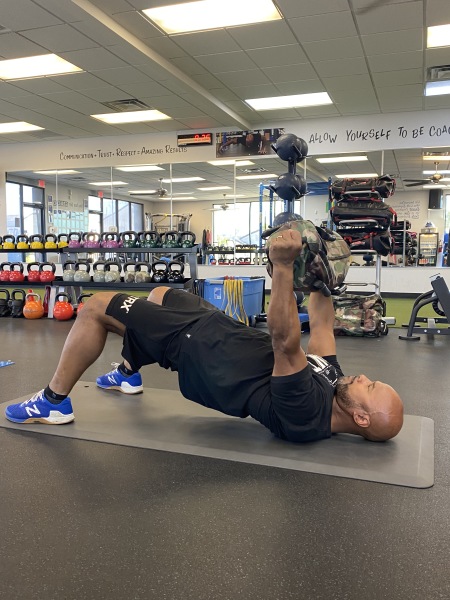
An ideal way to teach someone how to drive through their hips is to have them perform bridges on the ground. This achieves a few things. First, it’s safe and they can’t get injured. Remember that fear I mentioned earlier. I prefer having people do their bridges holding an Ultimate sandbag over their chest. As they bridge up by driving their feet into the ground, I have them pull the bag apart. This engages the latissimus dorsi or lats. Their body will start to neurologically learn how to engage their lats when squeezing their glutes. This drill isn’t as dynamic as the swing or clean, but similar to learning how to write, you have to learn how to put the sentences together.

Step Three. Once they master this, get them on their feet and progress them into dead-lifting. Dead-lifting teaches them how to handle ground forces. It also starts to teach the user how to manipulate speed. Initially, you have them dead-lift slowly, with a goal that they start to speed up. If they are using a kettlebell, the cue is to bend the handle, if it’s an Ultimate sand bag you coach them to pull the handles apart. The objective here is that you want them to engage the lats similar to when they perform the bridge lying on the ground. Here’s a question. What if they have spine issues or scored poorly on the assessment for pelvic stability? Not a problem. You keep them executing bridges. There are progressions to that exercise which they can perform lying on the ground and you will keep them safe.
√ We’ve performed our assessment.
√ We’ve had them master floor bridges with the Ultimate sandbag.
√ We’ve taught them how to dead-lift properly.
Now they are ready to either swing a kettlebell or clean a sandbag. Getting to this step may require a month of training (2-3 sessions a week) for someone. What you have done in the process, if you follow these steps, is provide this person a blueprint for success. Strength training is a skill. As I mentioned earlier, similar to cooking or even learning to play a musical instrument, you have to follow the steps. To guarantee success, you must earn the right to proceed.
I’ll see you at the studio.
